
---------------------------------------------------------
Check out these lovely Tree-Change Dolls, made by a clever lady from Tasmania. She made a few, took some pictures, and posted them on Facebook. From there, social media and the crying need for dolls that look like real girls -- and not trollops-- took over, and the beautiful dolls went viral, gathering hundreds of thousands of "likes" in a few days. She only had 12; for the most part, she's not selling, though she does have an Etsy shop. I'm sure, given the huge demand she's suddenly very aware of, that prices will be high.
But she did do a tutorial on how to get the paint off. And, starting from there, I'm doing a pair of make-overs that are completely inspired by her work. I think it's fabulous, and I'm grateful she's shared it with the world. Redoing existing dolls solves nicely my discomfort with commercially available dolls, which is, for me, well worth the effort. My Tigress adores dolls! "Bay-bee!!"
Actually, there's a lot of tutorials out there. My Tigress showing interest in our friends' dolls, I want to give her some that look like girls I'd be comfortable with her spending time with, were they real. Image matters, not because one group is better than another, but because the branding people choose tells you things about how they spend their time and the attitudes they have adopted. I want my girl's dolls to encourage our family's values, not normalize things which we find inconsistent with our values. So here is my process, including the tutorials I have used, all inspired by the lovely Tree-Change Dolls. A couple of my friends asked, so I am sharing the process I use to do this.
This is what my dolls looked like, right from the thrift shop. The one on a left is Bratz brand; I don't recognize the brand on the right. They're both in pretty good condition, though the one of them has a bit of nail polish on her eyes. Shouldn't be a problem, though.


And cleaning up is my first step. These girls need a bath, and they need their hair done. I looked at several tutorials. Everyone seems to agree on the same basic steps that this tutorial shows.
I also grabbed a couple little baggies of mini dolls. Not a bad haul for $7. I tossed a couple, but most of them were pretty nice. They should clean up well.
And cleaning up is my first step. These girls need a bath, and they need their hair done. I looked at several tutorials. Everyone seems to agree on the same basic steps that this tutorial shows.
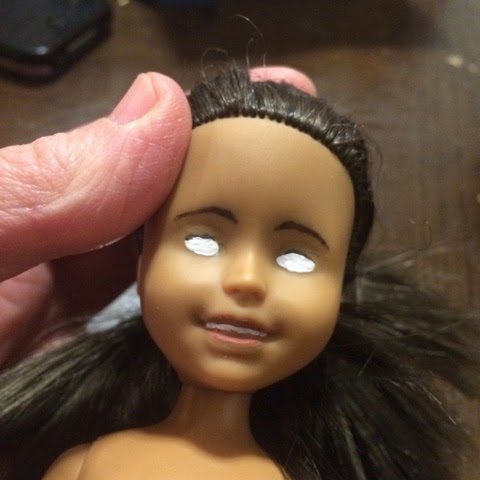
The dolls' hair cleaned up nicely, and both of them had just a few scuff marks on their bodies which also came off nicely. Now, it's time to take off their paint.

And the nail polish remover worked beautifully. I didn't have any, so I got some labeled 100% acetone, and had no problems with smudging, though it is pretty smelly stuff. The Bratz doll was really easy to clean.

The second doll has teeth as well as lips, and the tight corners were difficult to get into. I used a toothpick to push the cotton puff into the crevasses of her mouth. I think there may be a tiny bit left, but mostly, it all came off.

While I was at it, I also carefully removed the blush from one of the smaller dolls. She's clearly a little girl, and I didn't think she needed makeup. The q-tip did the job nicely, and I don't think I'll do anything else with her.

Figuring out what type of paint to use was the next challenge. Sonia doesn't have a tutorial on that part of the process, at least not at this point, so I went and looked at several other YouTube tutorials to see what other doll artists are using, and the consensus seems to be that acrylics are good, and won't damage the vinyl faces. Apparently some paints do. Some people are using the craft acrylics, and others are using the tube acrylics. I already have a pretty good collection of the craft acrylics, so that's what I chose. After my faces were finished, Sonia's husband, John, posted to her Facebook page about what she uses: Jo Sonja's paints, which seem to come in both tubes and craft bottles, so I'm still not sure what, exactly, she's using. She was able to find a matte varnish, so if I do very many of these, I'll get some, maybe, but the glossy varnish I did use worked well enough that I'm not in any hurry.
I couldn't find a lip tone that said bare, natural lips to me, so what I did was I picked a brown that was as close to the doll's skin tone as possible, in this case, I picked Folk Art's Coffee Latte (I took the doll into Hobby Lobby and held paint next to her until I found one I liked. Happily, it should work for both dolls.) and I mixed it with a red I liked, in this case Creamcoat's Tibetan Sunrise. But the color would depend on the doll's skin tone, I think.


I went ahead and did the Bratz doll with the same colors. The paint is ever so slightly translucent, so my white dot by her teeth took a couple coats to cover up where it got on the lips, but that's not a problem.

The white dot starts out big -my brush is both almost too big for the job, and also a bit older, so this is what I started with, and I had to cover quite a bit of it up. But I learned on miniatures, touch-ups are a normal part of painting, and it doesn't bother me to do some. Just start with the part that's in there deepest, and work your way out. In this case, there's only two levels: teeth and lips.

Her lips are moulded to be exaggeratedly big, but they turned out ok anyway. It kind of looks like she's pursed her lips, or is in the middle of saying something, and I can live with that. (If you like, you can do more teeth, like this one, which helps with the weird shape of the Bratz lips. I didn't see that idea until it was too late.)
Next, I needed to put back the eyes. Tigress doesn't like it that they have no eyes. "Eye! Eye!" That's what she's been telling me. One of the tutorials I looked at mentioned that the eyes should be just slightly off-white, which tracks with what I have observed messing around in Photoshop: stark white eyes are creepy. I've used Folk Art's Whicker White, and it's working nicely.

The second eye is a little more difficult, since I wanted it to be pretty close to the same shape as the first. Both dolls had their second eye-white wiped off completely with a bit of paper towel. The Bratz eye folds also got wiped away once, and repainted. The craft acrylics I am using are really forgiving, and you have a few minutes to mess around with them. A clean paintbrush can also be used to pick up small amounts of excess. The paint isn't hard to wipe away at all, if you need to correct something, as long as it's still wet you're good.
I did eyelashes and eyebrows next. The paint I got is nearly an exact match for the skin color of the dolls, especially the Bratz doll, which I am doing first, so I mix up a little bit of paint that's ever so slightly darker.


When my friend Jay Fullmer first taught me to draw, he loaned me the book, "Drawing on the Right Side of the Brain," and I did about 3/4 of the exercises in the book before I got distracted. The important thing in drawing is to draw what you really see, and not what you think you ought to see. Turning your paper and your reference material upside down can trick your brain to stop seeing what it expects, and start seeing what is really there, and that's how I got the eyebrows as close to symmetrical as I did: upside down, I had to think about angles and line lengths, because it was a lot less "eyebrow" looking. So it was a lot easier that way. Keep an eye on your anatomical reference points, too: how far past the beginning of the eyeball should your line begin? How far into the well of the eye? I recommend you get a reference picture from a doll you like. Use it with your first eyebrow, then copy your own work to make the second one. The second doll had bits of her eyebrows erased several times while the paint was wet, but I managed to avoid the nail polish remover.
The next task is the irises themselves. So much about these dolls is the same; I think I'm going to give them different colored eyes. Their skin is dark enough that blue doesn't make a lot of sense, so I'll be going with green and brown.
I grabbed a pencil and sketched in the basics first. My Bratz doll also needed a little touch up where the eyelashes had pushed into the white eyeball, so I took care of that as well. All day, I've been referencing this picture from the real Tree-Change Dolls. I just love the way she turned out. So I had another look to see the details of how her irises have been done. I'm also drawing on this tutorial, which I used to make matching dolls for Tigress and her cousins last December.


Next, she needs a glint in her eye; glints make the eye look much more life-like. For this, I dug through my box of paint and found the stark white. I looked at my referral picture again, to see how she'd done her glint, since she did it so nicely. You can use the paint to kind of shape your brush a little, depending on how you dab it as you pick up your color. I flattened my bristles into a line, and used that to put the glint in.

The Bratz, now not so bratty, is almost done with her paint. I'm a little worried that my paint will chip off, so I picked up some Triple Thick at Hobby Lobby while I was getting supplies. It was recommended in this tutorial, here. It's glossy, but that works for lips and eyes. It may be a bit odd for eyebrows, but I doubt that Tigress will notice or care.

And her new paint job is done!

The second doll's eyes are just a little smaller, and my green completely covered the black dots I had made, so they will have to be put back before I go on.

So put back the irises, and used my toothpick to add gold flecks to her eyes, but they're too obvious, so I'm going back with another green, slightly lighter than the rest, to cover them up a little.


Next, I started looking for a tutorial for making clothes. There are lots of tutorials out there for making Barbie clothes, but I knew this could get a little interesting, because these dolls aren't as big as big as Barbies, and, looking at the dress the one doll came with, I can tell that regular Barbie clothes are going to be big. So I started working. First, a skirt, because they are easy to make. I used this tutorial. The waist had to be taken in a little, which I did by starting about 3/4 of the way down the skirt and slanting in from the original stitching as I moved toward the top. It's still a little generous, but it works. Next time, I will make the skirt a little bit smaller, with an elastic that's only 3.5 or even 3 inches long, rather than the 4 inches the tutorial recommends.

After that, a shirt was in order. The same blog had a nice shirt tutorial, one that goes together very easily, so I went with that. This time, I started with the suggested measurements, but held them up to the doll as I went along, and just sort of snipped off the excess. I have no idea what the actual measurements are, but it turned out pretty well, I think. I still need to add velcro to the back, since I forgot to buy that when I was out yesterday, but even without it, you can see that the doll is starting to shape up nicely. One tip: keep your excess threads to a minimum, and clip them close to the fabric as you go along. I often go back and trim my threads at the very end of the project, but this one doesn't like to do it that way. Being so small, the threads look terrible, and they get in the way as well. Plus, I had some close calls where I almost clipped my little shirt when the layers were all together and I had to go back and clip in between them. Do it as you go along.


3 comments:
Awesome! I've seen the Tree Change dolls and love the idea. They are amazingly spendy to buy; she puts out batches periodically but they go so fast! Ithink her mom knits some clothes for the dolls too,do you knit?
Still, yours look great! Love the green eyes :) Hooray for YouTube tutorials!
I know. I was looking at Etsy for new clothes for these girls yesterday, and choking. I could spend as much on an outfit for the dolls as I do for my real live daughter! It's kind of nuts. So maybe I'll suck it up and make some clothes. It bloggles my mind that people pay that much for doll clothes, particularly the ordinary ones.
Beautiful job!
Post a Comment